Standing Balance Exercises for Seniors: A 7-Day Plan
Standing balance exercises for seniors are simple moves you do on your feet, with one hand resting on the kitchen counter. You drift your weight in each direction, reach out while your feet stay still, and stand with your feet a little closer together. This 7-day plan gives you one short block a day, about 10 minutes.
Check with your doctor before you begin, especially if you fell in the past year, feel dizzy often, had recent surgery, use a cane or walker, or take heart or blood pressure medicine. Stop and sit down at once for sharp pain, dizziness, chest discomfort or shortness of breath.
What standing balance exercises for seniors look like
They look almost too easy. Your feet stay on the floor for every move in this plan, and you don't step, hop or rise onto your toes. The work happens in small places: the soles of your feet, your ankles, the sides of your hips.
Here are the four moves this week uses, all from Tai Chi Walking for Balance:
- Four-direction weight shift. Your weight drifts forward, back, right and left while both feet stay flat.
- Clock reach. One hand reaches toward points on a pretend clock on the floor, while the feet stay still.
- Narrow stance. You stand with your feet side by side, touching or almost touching.
- Half-tandem stand. One foot slides forward about half a foot length, so its arch sits beside the other big toe.
Set up your spot first
Pick a stretch of kitchen counter about 6 to 8 feet long. That's roughly four or five small steps. Clear the floor of rugs, mats, cords and pet bowls.
Put a sturdy chair with no wheels about one step behind you, so you can sit whenever you like. Wear flat shoes that grip, since socks can slide on a smooth floor. For the narrow stances, it helps to have someone in the room the first few times.
Day 1: Drift in four directions
Start with the four-direction weight shift. Stand side-on to the counter with your near hand resting on it and your feet hip-width apart. Let your weight drift slowly toward your toes, then come back to the middle. Drift toward your heels and come back. Then drift right, then left.
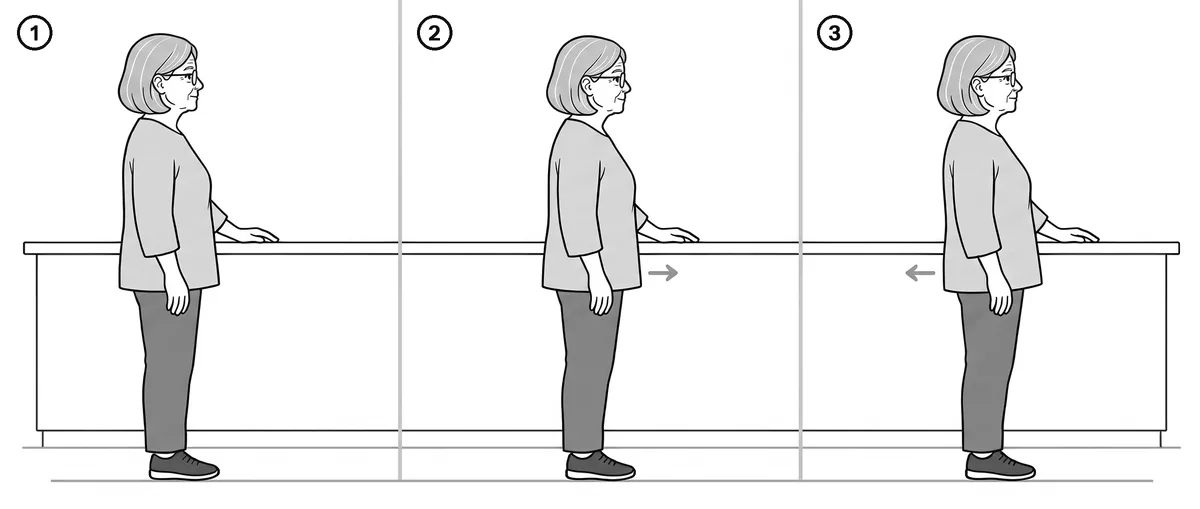
Do 4 rounds. Feel: the pressure moving from the balls of your feet to your heels. Avoid: bending at the waist. Your body tips from the ankles in one tall piece, and your heels and toes never lift.
Day 2: Add the clock reach
Repeat Day 1, then add the clock reach. Stand side-on with your left hand on the counter. Picture a big clock on the floor, with 12 straight ahead and 3 out to your right. Reach your right hand toward 12 at chest height and bring it home. Then reach toward 2, then toward 3.
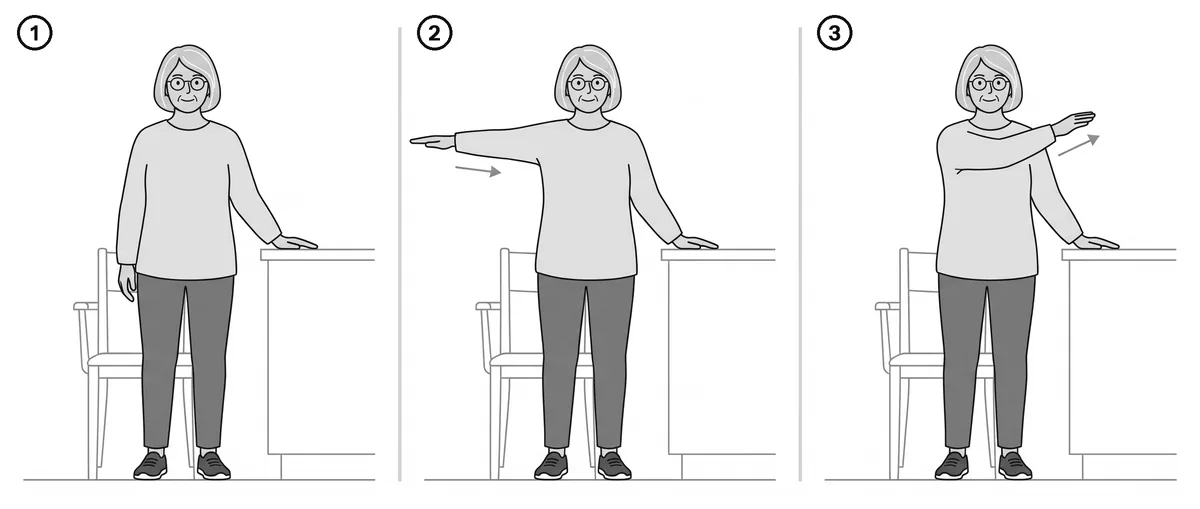
Turn around and do the same with the left hand, toward 12, 10 and 9. Do 2 rounds with each hand. Feel: your weight staying over your feet while the arm travels. Avoid: letting your nose pass your toes, or taking a tiny step.
Day 3: Try the narrow stance
Keep your Day 1 shifts as a warm-up. Then bring your feet together, side by side, with one hand on the counter. Stand tall, soften your knees and look at the wall ahead.
Hold for about 10 seconds. That is close to two slow breaths. Step your feet apart and rest, then repeat for 3 holds in total. Feel: small, quiet sways that settle on their own. Avoid: looking down at your feet. Your eyes on the wall help your body find the middle.
If this feels like a lot, face the counter, rest both whole hands on it, and leave a small gap between your feet. That version counts fully.
Day 4: A lighter day
Some days you will sway more than others. Sleep, mood and the time of day all play a part. Day 4 is short on purpose, to rest your ankles.
Do the four-direction shift and one round of the clock reach, nothing more. Breathe out as you move away from the middle and breathe in as you come back. Feel: the breath setting the pace. Avoid: rushing to make the session longer. A short, calm day is still a full day.
Day 5: The half-tandem stand
Start with feet together and one hand on the counter. Slide your right foot forward about half a foot length, so the inside of your right arch sits next to your left big toe. Stand tall with your weight even on both feet.
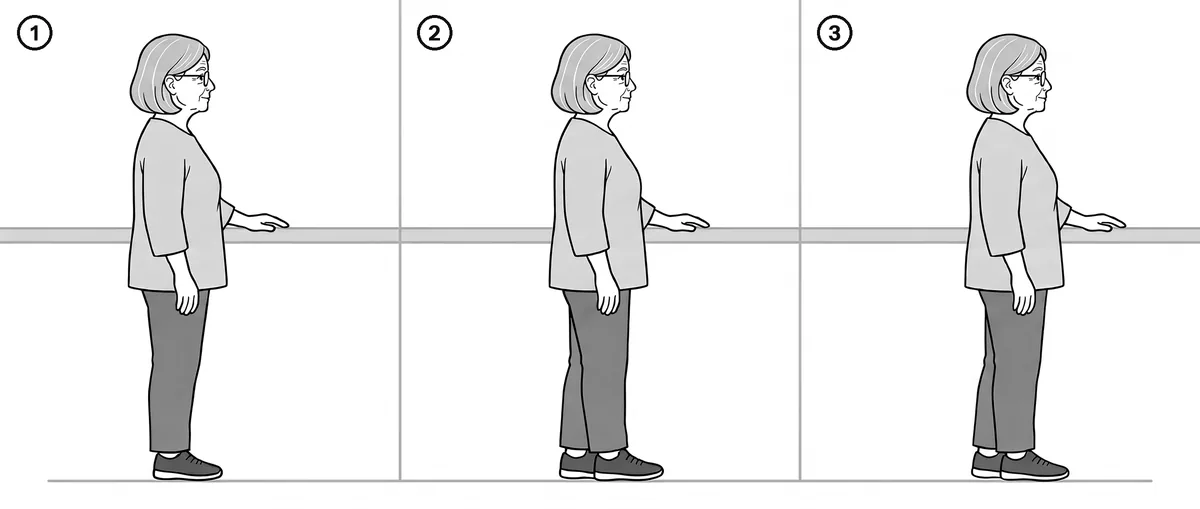
Hold 10 seconds, bring your feet together, and switch to the left foot in front. Do 2 holds on each side. Feel: both feet sharing the work. Avoid: turning the toes out. Both toes point straight ahead. If you wobble, bring your feet together and take one breath before the next try.
Day 6: Put the four moves together
Today you do all four in order: shifts, clock reach, narrow stance, half-tandem. It takes about 10 to 12 minutes with short rests.
If Days 3 and 5 felt steady, you can try a lighter touch on the narrow stance. Rest only your fingertips on the counter edge. Feel: your feet taking over the work your hand used to do. Avoid: lifting the hand away. The fingertips stay on the counter every second.
One foot in front may feel steadier than the other. Give both sides the same time anyway.
Day 7: Choose
Day 7 is your choice. Repeat your favorite day, or rest. Both count.
If you'd like a record, write down how long you held the narrow stance and the half-tandem, and whether you used whole hands or fingertips. The home balance check shows a calm way to keep such notes without turning them into a test.
How to continue after the first week
Keep the same four moves for a second week, and grow them slowly. Build the narrow stance from 10 seconds toward 30. Keep the half-tandem holds at 10 seconds. Add a pause of three counts at the far end of each weight drift.
When standing still feels settled, try one of these:
- Add slow steps along the counter with the walking balance exercises.
- Practice the small-step turn, since turning around is a common wobble moment in a kitchen.
- Print the free starter routine and tick off each day.
The full heel-to-toe stand, with the front heel touching the back toes, comes later. It's the narrowest stance of all, so it's best saved for a week when the half-tandem feels easy. Tai Chi Walking for Balance lays out all six weeks at the kitchen counter, with a card for each day and the steps from stances to turns and one-leg moments.
Your next step today: clear 6 feet of counter, put a chair behind it, and do Day 1.
Questions people ask
How long should I hold a standing balance exercise?
In the first week, about 10 seconds per hold is plenty, which is roughly two slow breaths. In the second week you can build a feet-together stand toward 30 seconds if it still feels calm.
Should I let go of the counter to make it harder?
No. To make a stance harder, rest only your fingertips on the counter edge. Keep that light touch the whole time and never let the hand leave the counter.
Is it normal to sway a little?
Yes. A small sway is your body making tiny corrections. If the sway grows, press the counter more firmly or move your feet apart, then take one breath before you try again.
What if my ankles feel tired the next day?
Many people notice tired ankles or tired sides of the hips after narrow stances. It usually fades in a day or two. Use the easier version until it does.
Keep reading
- Balance Test for Seniors at Home: A Gentle 5-Day Check
- How to Turn Without Losing Balance: Small-Step Turns
- Walking Balance Exercises for Seniors: 3 Tai Chi Walks
- How to Stand on One Leg Safely at the Kitchen Counter
- Balance Exercises for Seniors at Home (With Pictures)
- About the book: Tai Chi Walking for Balance